Why ubuntu?

I would like to start by thanking a few people who helped me alot in linux. I was a total noob with no background in linux. Dittmerdan, Nano, Cereal from the computerhelpforum.org. Without their advice, I won't get this far.

My guide will cover all the way from how to get your drive partitioned to installing. Even if you totally have no clue on what the hell this thing is about. Just follow the whole guide from the start of the first post will get you a free usable and functional OS. Just follow exactly and you will have everything up and running.

What's good about learning this?

The best part of ubuntu is that it can be booted up on the CD itself and run as a full OS and is very handy whenever windows gets into a BSOD crash.
Simply hook up an external drive and you can copy everything out.
Another reason to use ubuntu is that it is totally un infectable by any virus or malware, which makes it a very safe OS for your work.

You can don't game, but I don't think you can survive a few weeks without going online.

This blog has been viewed

advertlets

Saturday, November 29, 2008

Setting up internet connection


Setting up internet connection in ubuntu is quite straight forward.
Click on system => administration => network to access the settings to configure your network.

If you are using wired cable connection, it will auto detect and absolutely no settings like in windows.

As for ADSL connections, you will need to google search on how to configure the settings to connect to the broadband.

I will list out some of the different ways to connect using ubuntu.

1) Connect using wvdial.conf

In ubuntu, there is a text command that will create a internet connection. This is mainly used in PPPoe devices, In layman's terms, broadband in a sim card using a usb dongle.

Here's how to bring out the config.
open up the terminal
Navigate to the
etc folder.
type
cd .. [ do it twice ]
type
cd etc
type
sudo gedit wvdial.conf
Key in your password [ nothing will be displayed as you key in the password, hit enter when you are done]

A notepad will show up with these

[Dialer Defaults]
Phone =
Username =
Password =
New PPPD = yes


Simply insert this entire chunk below

[Dialer
yourispname]
Init2 = ATQ0 V1 E1 S0=0 &C1 &D2 +FCLASS=0
Stupid Mode = 1
Modem Type = Analog Modem
Phone =
*99***16#
ISDN = 0
Username =
vodafone
Dial Command = ATDT
Init1 = ATZ
Password =
password
Modem = /dev/ttyUSB0
Baud = 460800
Init4 = AT+CGDCONT=1,"IP","
sunsurf"

Those in bold means that you need to replace with your own settings. As for the phone number, you can check the number by entering windows to look at it. It is in the "connect to" settings.


The user name and password don't really matter, but you have to write something. it can also be seen via windows, as for password, it can be anything.
As the the last init4 string, You can opt to omit that string, but it would be better to check out your ISP APN. It would make the connection connect faster if you are able to specfiy the APN. This APN can usually be googled online with regards to your ISP.
Also, the last entry has to be keyed in manually, If you copy it off my blog and paste it to the wvdial.conf. Surprisingly, it will fail to send command. Strange bug.

Once you are done, save notepad and run the command off the terminal
wvdial
yourispname

You will see as the screen shot and you will be able to surf by starting the firefox. Remember to uncheck the "work online" in the file menu.


2) Connect using Wifi wireless network

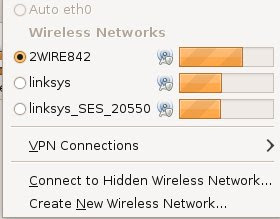
If you have a wireless device connected, the network manager on the top right hand corner will show wireless signals around the area. Just Key in the WEP Key or passphrase as you would in windows and it will connect.

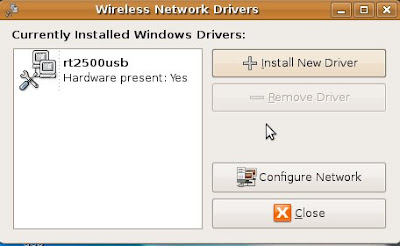
If the wireless device driver is missing, you can make use of the windows drivers to start up the device, there is a program called ndiswrapper that you can install from the add/remove menu. Simply copy the entire driver CD that contains the drivers to an empty folder, Use the terminal and type sudo ndisgtk. This will bring up a graphical user interface of the ndiswrapper program. Navigate to the folder that contains the drivers. Choose the driver file which is usually an inf file and you should see that the device is working properly.

2.1) Download the ndiswrapper first


2.2) Type sudo ndisgtk

You will have to wait for the program to load. Click on install new driver. Select file, click on browse. As you can see, I am using linksys as an example.
This is actually the windows driver file. Just navigate as you would in windows to pick out the driver file.


2.3) Check if hardware is present.


2.4) Connect using the network manager at the top right hand corner


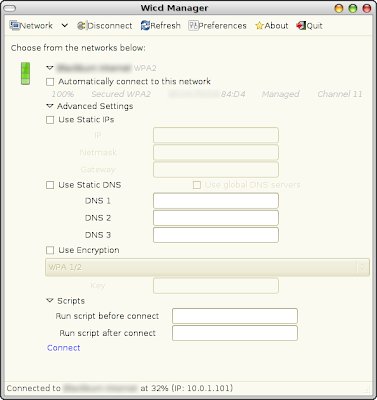
3) Connect using Wicd, This program is another alternative to the default connecting program - network manager. You may wish to try this if using the network manager fail to connect for you. First, you have to download the deb package off the wicd site.


Next you will need to remove the network manager totally. Remove it by starting the add/remove manager. Uncheck it and apply.
Also paste this command in the terminal to finish off the removal

sudo apt-get purge network-manager-gnome

Do a restart and you can double click on the wicd deb file to install wicd.

Wednesday, November 26, 2008

Different ways to install programs


It is slightly different when installing software in ubuntu, but things are getting easier for windows users to adopt to.  Especially if you are used to double clicking to do everything.  There are a few more simple ways to install new software into ubuntu.

1) Using synaptic package manager

Use the built in synaptic package manager to add and remove programs that you want to install.  This is the apt-get command in linux in graphical user interface. Just click on system > administration > synaptic package manager
Search for the program that you want, check the box and click on apply to install it.  It will check the additional packages that are needed for you to make the program work.  Just untick the box to uninstall.  It's that simple.


2) Download the Deb packages

This Deb package sounds very foreign to windows users, but it works in the similar manner like a setup.exe which you just double click and it will install by itself.  This is one of the easiest method to get a program installed apart from using the synaptic package manager.  The synaptic package manager only lists the programs that are acknowledged by the developers themselves.


3) Using the add/remove programs menu 

The name tells it all.  You can access this feature from the Applications menu.  This is a easier interface instead of synaptic package manager.  You are able to read what the program is all about in the descriptions, but synaptic package manager will only write technical details, which is difficult for a new user to understand. 


4) Get tar.gz packages 

This is another thing that is strange to a windows user.  It is just the zip file equivalent in linux that contains all the necessary files in a archive.  You just need to extract the stuff to a folder and look for a readme file to see what are the instructions to get the program installed.  Some programs are as simple as extracting it to a folder and double clicking on the program's "exe" equivalent in windows and the program will run.  Example flock browser.


5) Get a .run file 

This is a self extractor equivalent in linux.  It will extract the files to its pre-programmed folder and create shortcuts.  .Run packages do not create any entry in the system and has to be removed manually.  Which is more tedious when it comes to getting the program uninstalled.  
A run file has to be executed using the terminal.  Put the file to a directory of your choice, navigate to the directory then you can run the .run file as follows.
1)  sudo chmod +x file.run 
2) sudo ./ file.run

6) Making use of apt-get or wget install command.

This is one of the best ways to install programs in ubuntu.  In some web sites, a long string of command or even several strings of long commands. Simply copy and paste it into the terminal and the program will be installed automatically.  You don't even have to understand what the long script is all about.

Have I left out any?  I will add more if i come along.  Oh yes, there is the rpm package, but that is more commonly used on a red hat linux distro package.  There is usually no need to specifically download a rpm, as there will usually be the tar.gz or deb packages available for download.


Tuesday, November 25, 2008

How to install Ubuntu 8.04


There are many versions of ubuntu out there and the current latest version is 8.10. However, I suggest getting 8.04 as it is a LTS version, which means "Long Term Support" untill 2011.
You can download it through its website. Or if your internet connection disconnects all the time, you can choose to get it via bittorrent p2p programs.

Burn the downloaded file into a blank CD and there's 2 ways to install it.
1) You can double click on the wubi.exe in the ubuntu 8.04 CD to allow windows to install it like another program so that it can be easily removed if you don't like it.

2) You can boot it up using boot from CD drive just like any windows XP. There will be a menu to install it or to try it. But if you intend to install it in a separate drive, always backup all your precious data before proceeding. Most windows users don't have a decent partitioning software to get the drive in linux ext format, and don't expect winXP to do that for you in compmgmt.msc. Good news is, there's a free partitioning software call Gparted live CD which is fantastic at formatting, or resizing your drive. Good for windows too.

If you have only one hard drive, you can partition your drive before installing ubuntu. Load up Gparted and click on resize. Drag the slider to make your C: smaller. Then you can see a grey portion for a new drive.


Now you can click on the grey part and create new partition. Choose a format like fat32 for example. A new drive will appear in windows. When you decide to install ubuntu, you can use the newly created drive for it instead of using your whole windows drive.


Here's a step by step guide on how to install in the graphical interface

When you are done partitioning, You will realize that
when Ubuntu ask you to specify the space to install, You
can drag the slider to the left or the right. The trick is to
allocate the ubuntu at the right end of the drive, because
an additional drive will be created, which is the one in the
middle. This is because, this extra space is initially
intended to be shown in windows. If you don't want the
extra drive, run Gparted again to delete and drag the
windows partition all the way to use the full drive.


Note: Windows users, are not used to the fact that
linux requires you to key in auser name and
password. Do not leave it empty like we love to do
in windows and hope that it would load into the desktop
by itself because this is something very different in linux.

Unless you install it on it's own and not through wubi,
there's an option to click to auto login on startup.